

The fastest reliable approach to remove an old fence: strip the panels first, then pull posts with a farm jack or hydraulic puller, dig out stubborn ones, and cut-and-bury only as a last resort.
Quick decision guide:
- Pull with a jack or puller when posts are sound and set in soil only. This is the fastest method for most backyard wood fences.
- Dig and pry when posts are loose, partially rotted, or when you want to protect nearby landscaping from the force of a mechanical pull.
- Cut at ground level and bury only when a post is deeply rotten, sits too close to utilities, or is simply impossible to extract without major excavation.
- Concrete-set posts change the math entirely. Expect to rent a jackhammer or mini-excavator, or budget for a contractor. Concrete footings are a major cost and time factor on many removal projects.
- Rotten posts should never be pulled. They snap at the ground line, leaving a buried stub that still needs to be dug out. Inspect before you commit to a method.
Before you touch anything: call 811 to mark underground utilities, confirm your property line, and check local permit rules. In New Jersey, fences six feet or under generally don’t require a state construction permit, but pool barriers are a firm exception, and many municipalities layer on their own zoning requirements regardless.
Key Takeaways
Removing an old fence successfully comes down to inspecting posts before choosing a method, planning for concrete, and confirming local permit requirements before you start.
| Point | Details |
|---|---|
| Inspect before you pull | Probe each post for rot; rotten posts snap at ground line and require digging, not pulling. |
| Concrete changes the budget | Footings add $150–$250 in rental and disposal costs; plan for a jackhammer or mini-excavator. |
| Call 811 first | Mark utilities before any digging to avoid gas, water, and electrical line strikes. |
| Permits vary locally | NJ state code exempts fences under 6 ft, but local zoning permits may still apply in your municipality. |
| Advantagefencenj covers the hard parts | Full removal, concrete extraction, permitting help, and reinstallation across four South Jersey counties. |
Table of Contents
- What tools do you need to remove an old fence?
- What to inspect and check before you start
- How to remove fence panels, rails, and pickets
- What are the three main methods for removing fence posts?
- How do you remove posts that are set in concrete?
- What do you do when posts crumble, snap, or won’t budge?
- How do you dispose of old fence material responsibly?
- How long does fence removal take, and what does it cost?
- When should you hire a professional instead of doing it yourself?
- A fencing professional’s honest take on DIY fence removal
- Advantagefencenj handles removal, disposal, and what comes next
- Sources
What tools do you need to remove an old fence?
Getting the right gear before you start saves a wasted trip to the hardware store mid-project. Here’s what you’ll actually use.
Hand tools form the backbone of any fence teardown. A digging bar (also called a breaker bar) breaks compacted soil around post bases. A long-handled pry bar levers rails and pickets free without splitting them. A claw hammer and a cat’s paw nail puller handle stubborn fasteners. A flat-blade shovel clears loose soil, and a sledgehammer drives the digging bar and breaks apart concrete chunks.

Power tools speed up the panel work. A reciprocating saw with a demo blade cuts through nails, screws, and rotten wood in seconds. A circular saw handles clean cuts on rails you want to salvage. Neither is strictly required, but both save significant time on a fence longer than 50 feet.
Specialized post-removal gear is where most DIYers under-budget. A farm jack (also sold as a high-lift jack) paired with a chain or strap around the post base is the go-to mechanical puller for soil-set posts. Hydraulic post pullers, which clamp around the post and use a hydraulic ram to extract it, are available at most equipment rental yards. For concrete footings, a rotary hammer or electric jackhammer is the minimum; a mini-excavator makes the job dramatically faster on projects with more than a handful of concrete-set posts.
PPE checklist: safety glasses or goggles, leather work gloves, steel-toe boots, and hearing protection when running power tools. Add a dust mask if you’re breaking concrete or cutting old pressure-treated wood.
What to inspect and check before you start
Skipping prep is how a half-day project turns into a three-day ordeal. Walk the fence line before you pick up a single tool.
- Call 811. This is non-negotiable. The free national dig-safe service marks buried utilities within a few business days. Gas, water, and electrical lines often run near fence lines, especially along property borders.
- Confirm your property line. A survey pin or plat map tells you exactly where your fence sits. Boundary fences on shared property lines can be joint responsibilities, and removing a shared fence without neighbor agreement can create legal headaches.
- Assess every post individually. Probe each post base with a screwdriver. Solid resistance means a sound post. Easy penetration means rot. Mark each post with spray paint: green for pull, yellow for dig, red for cut-and-bury. This five-minute step saves hours. Rotted posts should not be pulled; they break at the ground line and leave a buried stub that still needs digging. Assessing post condition before choosing a removal method is the single most important pre-work step.
- Identify concrete footings. Probe around the post base with a metal rod. If you hit resistance 6–8 inches down, there’s likely a concrete collar or full footing. Plan accordingly.
- Check permits. New Jersey’s state code exempts fences six feet and under from construction permits, but many NJ municipalities still require a zoning permit or site plan, and skipping that step can mean fines or a mandatory removal order. Call your local zoning office before you start, especially if you plan to replace the fence immediately after.
How to remove fence panels, rails, and pickets
Work from the top down and from the gate outward. Gates are the heaviest individual pieces and the most awkward to handle once surrounding panels are gone. Remove gate hardware first, lift the gate off its hinges with a helper, and set it aside.
Sequence for panel removal:
- Remove any cap rails or top boards running along the fence top.
- Detach pickets from the horizontal rails. Use a cat’s paw to back out nails, or a reciprocating saw to cut flush if you’re not preserving the boards.
- Pull the horizontal rails free from the posts. Most are toe-nailed or screwed. A pry bar against the post face gives you enough leverage without splitting the rail.
- Repeat bay by bay, stacking material as you go to keep the work area clear.
Preserving boards for reuse takes more time but can be worth it for quality cedar or redwood. Un-nail carefully, label each board with its position using chalk, and accept that any board showing soft spots or gray punky wood is not worth saving.
On sloped ground, panels often aren’t level, and the bottom rail may be buried or partially in contact with soil. Dig a narrow trench along the base before prying to avoid snapping rails. In tight access areas, like a fence running along a narrow side yard, work from one end only and pass boards overhead rather than trying to turn them.
Pro Tip: A reciprocating saw with a long bi-metal blade cuts through buried nails and screws in seconds. Run the blade flat along the post face to sever fasteners without damaging the post, which matters if you’re pulling posts next and want them intact.
What are the three main methods for removing fence posts?
Common post-removal techniques include using a farm jack or post puller, creating a fulcrum and lever, or digging the post out by hand. Here’s when each one makes sense.

Method A: Mechanical pull (farm jack or hydraulic puller)
Best for sound posts set in soil with no concrete. Wrap a chain or heavy strap around the post as low as possible, hook it to the jack’s lift arm, and pump. The post typically comes free in under five minutes. Keep bystanders clear; if the chain slips, it moves fast.
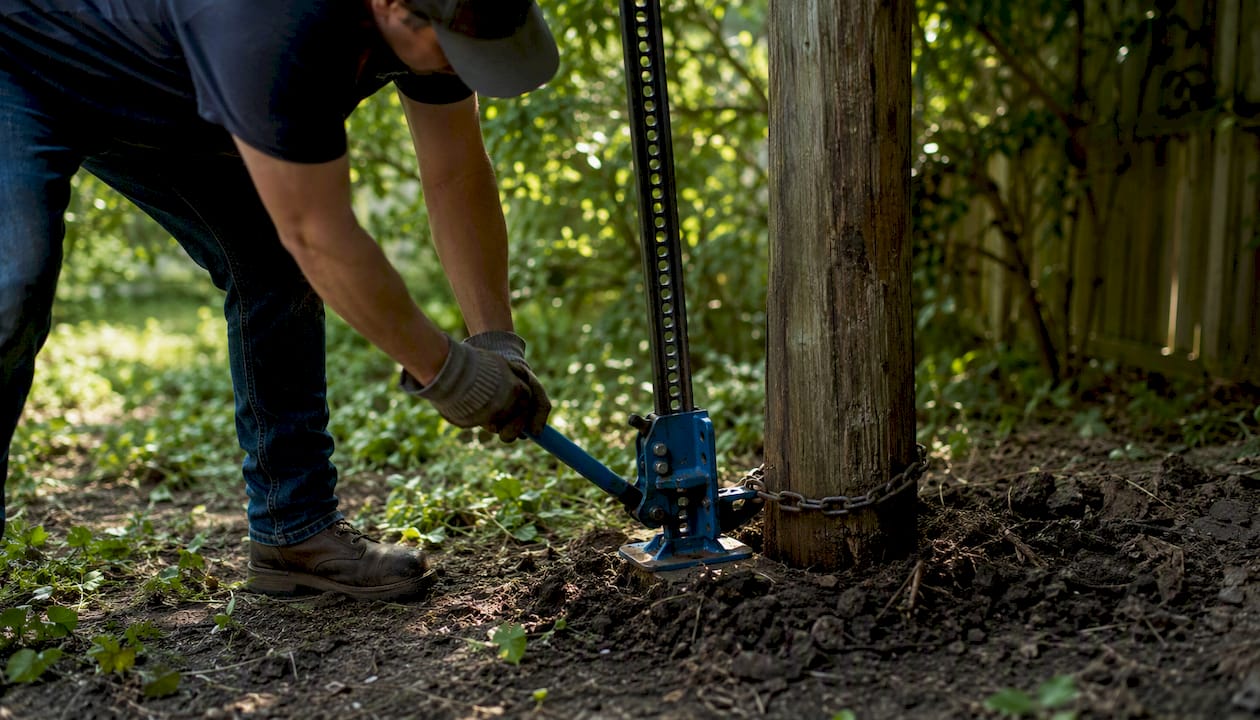
Pros: Fast, low labor, no digging required.
Cons: Fails on rotten posts (they snap), ineffective against concrete footings, can heave surrounding sod.
Method B: Dig and pry
Dig a 12–18 inch ring around the post base with a digging bar and shovel, then lever the post out using a 2×4 or pipe as a fulcrum against the hole edge. A second person pushing while you pry makes a real difference. Lay plywood under your fulcrum to protect finished yard surfaces.
Pros: Works on partially rotted posts, protects landscaping, no specialized rental gear needed.
Cons: Slow, physically demanding, harder in clay or rocky soil.
Method C: Cut at ground level and bury
Cut the post flush with or just below grade using a reciprocating saw or circular saw, then cap the stub with soil and compact it. This is acceptable when a post is deeply rotten, sits directly over a utility line, or when you’re not replacing the fence in that location.
Pros: Fast, no digging, avoids disturbing utilities.
Cons: Leaves wood underground to decay, can cause future sinkage, not appropriate where a new post will go in the same spot.
Quick decision matrix:
- Soil-only post, sound wood → Method A
- Soil-only post, partial rot → Method B
- Concrete footing, sound post → Method B or jackhammer (see next section)
- Deep rot, near utilities, or no replacement planned → Method C
How do you remove posts that are set in concrete?
Concrete footings are where DIY fence removal gets genuinely hard. You have three realistic options.
Option 1: Dig out the entire concrete block. Excavate a 12–18 inch ring around the footing, expose the full concrete mass, and lever the post-and-concrete unit out as one piece. This works when footings are shallow (under 24 inches) and the concrete block is small. It’s the right call when a new post needs to go in the same location.
Option 2: Separate the post from the concrete, then deal with the footing separately. Use a reciprocating saw or an angle grinder to cut the post at the concrete surface. Then either leave the concrete buried (acceptable when no new post is going in that spot) or break it out with a jackhammer. Rent an electric rotary hammer for smaller footings; a full electric jackhammer handles larger ones. Expect to spend 20–40 minutes per footing with a jackhammer.
Option 3: Mini-excavator. For projects with six or more concrete-set posts, a mini-excavator rental pays for itself in time. The bucket can grab the post and footing together and pull the whole unit in one pass. Rental runs $300–$500 per day; factor in a half-day for loading and transport if you’re renting from a local yard.
Pro Tip: Concrete chunks are heavy and awkward. Break large footings into manageable pieces with a sledgehammer before loading them. Most transfer stations and dumpster services accept concrete, but call ahead to confirm, since some charge extra for C&D debris.
Safety note: jackhammers generate significant vibration and flying debris. Wear goggles, gloves, steel-toe boots, and hearing protection. Never use a jackhammer near a marked utility line.
What do you do when posts crumble, snap, or won’t budge?
Rotten and stubborn posts are where most DIY fence projects stall. Here’s how to handle the most common failure modes.
- Post snaps at ground line during pulling: Stop immediately. Cut the remaining stub flush with a reciprocating saw, then dig a 12-inch ring around the stub with a post-hole digger. Use a pry bar to work the stub loose from the soil or concrete. If it’s embedded in concrete, you’re now in jackhammer territory.
- Post crumbles as you pull or dig: Cut as low as you can reach, remove what comes free, and dig out the remaining wood and concrete by hand. A narrow post-hole digger works better than a wide shovel in this situation.
- Post simply won’t move despite digging: Try a come-along (hand-powered cable puller) anchored to a vehicle hitch or a nearby tree. Apply steady tension rather than sudden jerks. If the post still won’t move after 12–18 inches of excavation and sustained tension, the footing is almost certainly larger than expected. At that point, renting a jackhammer or calling a contractor is the faster path.
- Restricted access: In a narrow side yard or against a wall, a full-size shovel won’t fit. Use a clam-shell post-hole digger or a narrow spade to excavate around the post base. Work in small increments and remove soil in buckets.
Pro Tip: Never burn old fence posts, even if they look like plain wood. Most residential fence lumber is pressure-treated with preservatives that release toxic compounds when burned. Bag or haul treated wood to a C&D disposal facility.
Pro Tip: If a post is so rotten it’s essentially a soil column, don’t fight it. Dig a clean hole alongside it, collapse the rotten material inward, and remove it in pieces. Trying to pull a disintegrating post wastes time.
How do you dispose of old fence material responsibly?
Getting the material off your property is the part most homeowners underestimate. Plan disposal before you start, not after you have a pile of lumber in the yard.
- Municipal transfer station or yard waste drop-off: Many counties accept clean untreated wood as yard waste or C&D debris. Call your local facility first; pressure-treated lumber is typically not accepted in the yard-waste stream and must go to a C&D landfill.
- Private dumpster rental: A 10-yard dumpster handles most residential fence teardowns. Expect to pay $300–$500 depending on your area and the weight of concrete. Schedule pickup before you start so you’re not paying for extra days.
- Junk-haul service: Services like LoadUp or local haulers will load and remove the material for you. Convenient, but typically more expensive than a dumpster for large volumes.
- Recycling: Metal fence components, including chain-link fabric, posts, and aluminum rails, are accepted at most scrap metal yards and often pay a small amount per pound. Vinyl fence panels are recyclable in some regions but not universally accepted; call ahead.
- Do not burn treated wood. Pressure-treated lumber contains preservatives that produce toxic smoke. This applies to most residential fence lumber installed in the last 40 years.
Cleanup checklist after removal:
- Fill post holes with compacted soil or gravel, then top with topsoil to match grade.
- If a new post goes in the same hole, pour fresh concrete and let it cure fully before attaching panels.
- Rake the fence line for nails, staples, and hardware.
- Communicate with neighbors if any debris landed on their side of the line.
How long does fence removal take, and what does it cost?
Time and cost both hinge on two variables: how many posts are set in concrete, and how far you are from a disposal facility.
Professional fence removal typically costs $300–$750 for a standard residential project, with most contractors charging $3–$7 per linear foot. Concrete removal and tool rentals add roughly $150–$250 on top of that baseline. For wood fences with difficult access or heavy concrete footings, per-foot costs can run $8–$22 depending on scope and location.
DIY costs are primarily rental and disposal. A typical 100-linear-foot backyard fence takes one experienced DIYer a full day for panels and soil-set posts, plus a second day if concrete footings are involved.
Budgeting tip: always add a line item for permit fees (typically $50–$150 in NJ municipalities that require them) and for unexpected concrete. A post that looks soil-set from above often has a collar you won’t discover until you start digging.
When should you hire a professional instead of doing it yourself?
Some projects are genuinely better left to a contractor. Knowing the line saves you time, money, and a sore back.
Red flags that point toward hiring a pro:
- More than four or five concrete-set posts, especially deep ones
- A shared boundary fence where neighbor agreement is unclear
- Tree roots growing through or around the fence line
- Poor access (narrow side yards, slopes, or fencing near a structure)
- A large project (200+ linear feet) that would consume multiple weekends
- Any situation where you’re not sure what’s buried near the fence line
Questions to ask contractors before signing:
- Is post removal and concrete disposal included in the per-foot price, or billed separately?
- Who pulls the permit, and is that fee included?
- What does site restoration include — do you fill and grade the post holes?
- Are you insured and licensed in this county?
- What’s the timeline from deposit to completion?
Local zoning rules vary widely even within one state, and contractors often include permitting in their bids to prevent homeowners from missing a local approval step. That alone is worth something on a project where a stop-work order would cost more than the permit. DIY projects carry real risks beyond the physical work, and understanding common pitfalls before you start can help you decide whether the savings are worth the exposure.
A fencing professional’s honest take on DIY fence removal
Most homeowners who call us after a DIY removal attempt ran into the same two problems: they didn’t inspect the posts before choosing a method, and they didn’t plan for concrete.
Pulling a rotten post with a jack feels like the right move until the post snaps six inches underground and you’re left with a buried stub and no good way to get it out without digging anyway. The inspection step isn’t optional. It changes your entire approach, and skipping it costs more time than it saves.
The other consistent mistake is underestimating concrete. A footing that looks small at the surface can be 18–24 inches deep and weigh 80–100 pounds. Without the right equipment, that’s a half-day of digging for one post. On a fence with ten concrete-set posts, that math gets painful fast.
Permits are the third area where DIYers get caught. The state exemption for fences under six feet is real, but it doesn’t override local zoning, and some municipalities in South Jersey require a zoning permit even for removal alone. A $75 permit is a much better outcome than a $2,000 fine or a mandatory re-removal order.
The jobs that make sense to DIY are the straightforward ones: a short run of soil-set posts, sound wood, easy access, and a clear disposal plan. Everything else benefits from at least a contractor consultation.
Advantagefencenj handles removal, disposal, and what comes next
Removing a fence is rarely just about the fence. Concrete footings, permit paperwork, neighbor coordination, and grade restoration all add up fast, especially when you’re also planning a replacement.

Advantagefencenj serves homeowners across Gloucester County, Camden County, Burlington County, and Atlantic County with full-service fence removal that covers the parts most DIYers find hardest: concrete footing extraction, permit assistance, and clean site restoration before the new fence goes in. The estimate process is straightforward: one site visit, a line-item bid that separates removal from installation costs, and a clear project timeline. No guessing about what’s included.
If you’re replacing the fence after removal, Advantagefencenj installs wood, vinyl, aluminum, chain-link, and composite fencing with material and design options matched to your property and budget. Request a quote from Advantagefencenj and get a clear picture of what your project actually costs before you commit to anything.
Sources
The following sources informed the cost figures, permit rules, and removal techniques in this guide. For permit specifics, always check your local municipal website directly, as zoning rules change and vary by town.
- How to Remove Fence Posts | Angi
- Fence Removal and Disposal Cost: Price Guide for U.S. Homeowners 2026 – Current Cost
- N.J. Admin. Code § 5:23-2.14 – Construction permits – when required | State Regulations | US Law | LII / Legal Information Institute
- Do I Need a Permit to Build a Fence in New Jersey? (2026)