

The most effective approach for landscaping along a fence combines a layered design: evergreen backbone plants for year-round structure, mid-height shrubs for privacy and seasonal interest, perennials or climbers in front, and groundcover at the base. This four-layer system works because each tier does a different job simultaneously, so you get privacy in winter, flowers in summer, and something worth looking at every month in between. Before you buy a single plant, mark your bed edges, call 811 to locate buried utilities, and plan for microirrigation from the start.
Quick-start checklist before you plant:
- Call 811 (free, federally required) to locate underground utilities before digging
- Measure your fence run and mark bed width with spray paint or a garden hose
- Space shrubs based on mature size, not nursery-pot size
- Install drip or microirrigation lines before mulching
- Apply 2–4 inches of mulch after planting to retain moisture and suppress weeds
Key Takeaways
A layered fence-line design with proper spacing, drip irrigation, and a mixed-species plant palette gives you year-round structure, seasonal interest, and a planting that actually gets easier to maintain over time.
| Point | Details |
|---|---|
| Layer your planting | Use four tiers: tall evergreens, mid shrubs, perennials/grasses, and groundcover for year-round interest. |
| Space by mature size | Low hedges need 18 inches apart; tall hedges need 3–4 feet; always base spacing on the plant’s mature size. |
| Use drip irrigation by hydrozone | Group plants by water needs on separate valves; place emitters at the dripline, not at the trunk. |
| Mulch at 2–4 inches | Apply shredded hardwood mulch 2–4 inches deep, keeping it clear of stems and fence posts. |
| Call 811 before digging | Locate buried utilities at least three business days before any digging near the fence line. |
Table of Contents
- What design rules make fence-line planting actually work?
- Which plants work best for each fence-line goal?
- Where exactly should you place plants along the fence?
- How should you water and maintain a fence-line planting?
- How do you get a great fence-line look on a limited budget?
- How to plant along your fence in 7 steps
- What should you do when fence-line plants go wrong?
- The tradeoff most homeowners get wrong
- Sources
What design rules make fence-line planting actually work?
Good fence-line planting starts with composition, not plant selection. Pick the wrong layout and even expensive plants look like a random collection of shrubs.
The rule of three is the simplest tool you have. Group plants in clusters of three, five, or seven rather than planting in a single-file row. On a long fence run of 40 feet or more, repeat a cluster pattern every 8–10 feet to create rhythm without monotony. On a short 10-foot section, one cluster of three anchored by a taller specimen in the center reads cleanly.
Layering is what separates a polished fence planting from a flat hedge. Think of it as four tiers:
- Tall backdrop (6 feet and up): columnar evergreens, arborvitae, or ornamental trees
- Midsize shrubs (3–5 feet): hydrangea, boxwood, or viburnum
- Perennials and ornamental grasses (1–3 feet): coneflower, salvia, or Miscanthus
- Groundcover (under 12 inches): creeping thyme, liriope, or low sedums
Sightlines matter more than most homeowners expect. If your fence borders a neighbor’s yard you’d rather not see, a full screen makes sense. If it borders a garden view or a tree line you actually like, leave gaps in the planting so you preserve that view while still framing it.
Always leave a maintenance strip of at least 18–24 inches between the back of your planting bed and the fence itself. You need room to repaint, repair, or replace fence boards without digging up established plants. A mower or trimmer also needs clearance along the base.
Pro Tip: Combine at least two different leaf textures in every cluster, such as a fine-needled evergreen next to a broad-leaved shrub. Texture contrast reads well from a distance and keeps the planting interesting in winter when flowers are gone.
Which plants work best for each fence-line goal?
Plant choice depends on what you need the fence planting to do. Privacy, flowers, low water, and deer resistance are four very different briefs.
Privacy and structure
Arborvitae (Thuja occidentalis ‘Emerald Green’) is the go-to for fast, narrow privacy screening. It reaches 10–15 feet tall and only 3–4 feet wide, which makes it ideal for tight side yards. Space them 3–4 feet apart for a dense screen within 3–5 years. One caution: deer browse arborvitae heavily in winter, especially in the Northeast. If deer pressure is high, consider a deer-resistant alternative or protect young plants with burlap wraps.
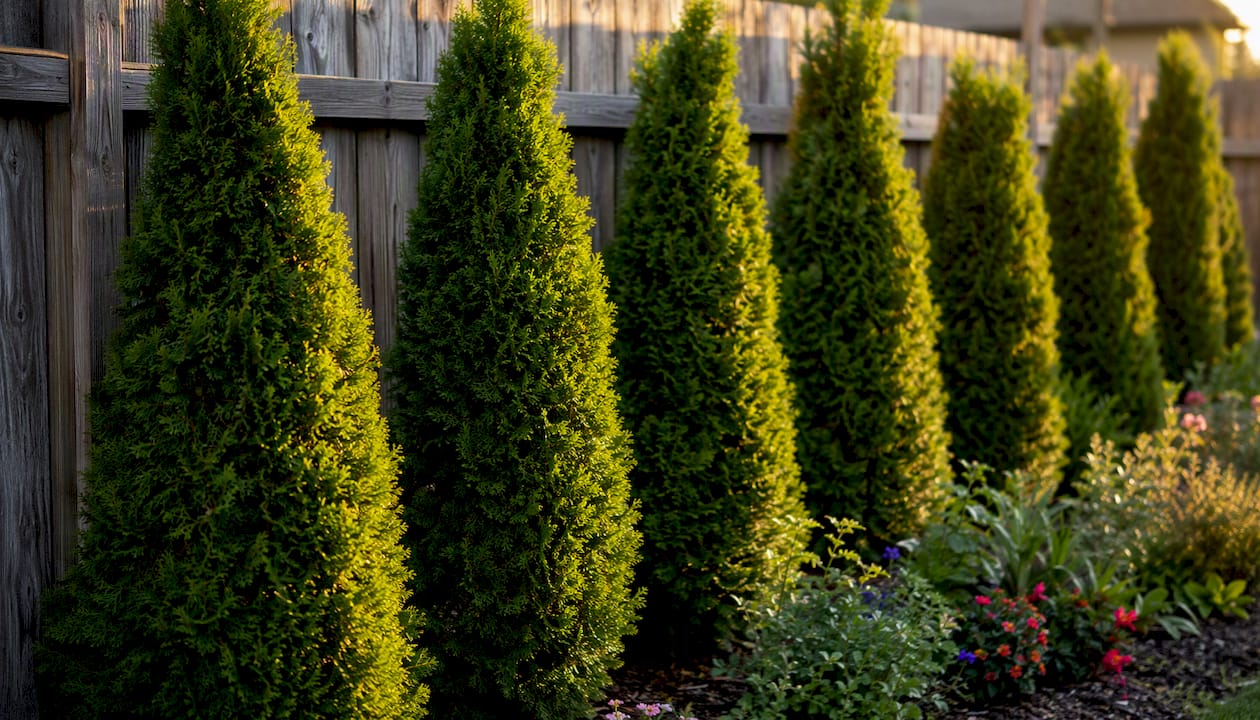
Boxwood stays dense and evergreen year-round, handles shearing well, and works as a formal low hedge or a mid-layer filler. Mature height ranges from 2–8 feet depending on cultivar. Boxwood blight (Calonectria pseudonaviculata) has become a serious problem in many states, so ask your nursery for resistant varieties like ‘SunKing’ or ‘NewGen Independence’ before buying.
Bamboo creates an almost instant privacy screen and looks dramatic against a fence. The problem is running bamboo (Phyllostachys species), which spreads aggressively via underground rhizomes and can invade neighboring properties. If you want bamboo, choose a clumping species (Fargesia genus) and install a rhizome barrier at least 24 inches deep. Running bamboo without a barrier is a landscaping decision you will regret within three years.
Flowering interest
Hydrangea (Hydrangea paniculata varieties like ‘Limelight’ or ‘Incrediball’) delivers large flower heads from July through September and dries attractively on the stem into fall. It grows 4–8 feet tall, tolerates part shade, and is largely deer-resistant. Plant it 4–5 feet from the fence to allow air circulation and prevent powdery mildew.
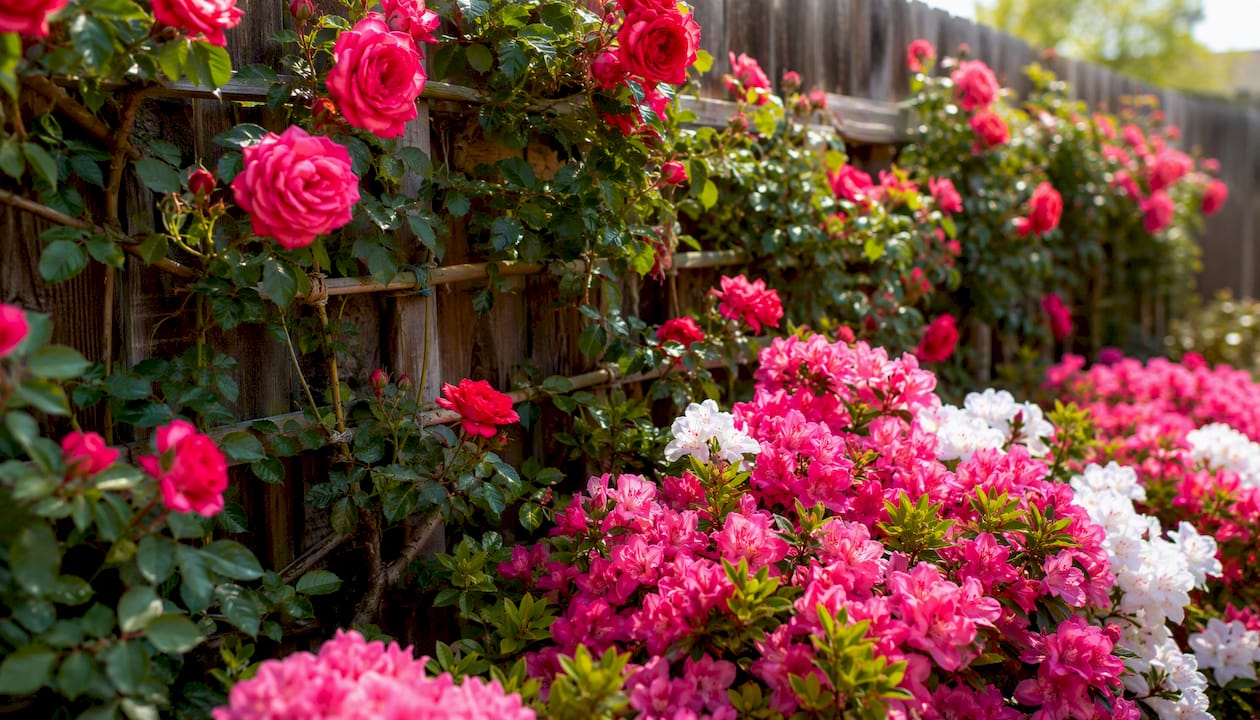
Climbing rose trained on a fence or trellis gives you vertical color without consuming bed width. Varieties like ‘New Dawn’ or ‘Zephirine Drouhin’ are disease-tolerant and repeat-blooming. Attach canes to the fence with soft ties rather than staples, and prune in late winter before new growth starts.
Clematis is the most versatile climber for fence lines. It pairs well with climbing roses, covers chain-link quickly, and comes in varieties that bloom in spring, summer, or fall. Plant the crown 2–3 inches below soil level to protect against clematis wilt, and give it a trellis or wire support attached to the fence.
Texture, movement, and low-maintenance options
Miscanthus ‘Karl Foerster’ (technically a feather reed grass, Calamagrostis × acutiflora) reaches 4–5 feet and produces upright plumes that catch light and move in the wind. It is one of the most reliable ornamental grasses for fence lines because it stays upright through winter rather than flopping. Cut it back hard to 4–6 inches in late February before new growth emerges.
A mixed-species privacy screen with layered heights and structural diversity is generally more resilient to pests, disease, and environmental stress than a single-species hedge. Mixing arborvitae with hydrangea, ornamental grasses, and a climber gives you redundancy: if one species struggles, the others hold the screen.
Where exactly should you place plants along the fence?
Spacing is where most homeowners make their biggest mistake. Plants go in too close together because they look sparse at nursery size, then spend years fighting each other for light and water.
ISA Arboriculture research gives clear benchmarks: low hedges (plants maturing at 3–4 feet) should be spaced approximately 18 inches apart, while tall hedge plants typically need 3–4 feet between them. Those numbers assume you want a closed screen.
Spacing and placement reference
| Plant type | Mature height | Spacing (closed screen) | Distance from fence |
|---|---|---|---|
| Low hedge (boxwood, dwarf shrubs) | 2–4 ft | 18 in | 12–18 in |
| Tall hedge (arborvitae, viburnum) | 6–15 ft | 3–4 ft | 24 in |
| Ornamental grasses | 3–5 ft | 24–30 in | 18–24 in |
| Climbers (clematis, rose) | Trained | 4–6 ft along fence | 12 in (at trellis base) |
| Trees (columnar) | 15–30 ft | 5–8 ft | 36 in |
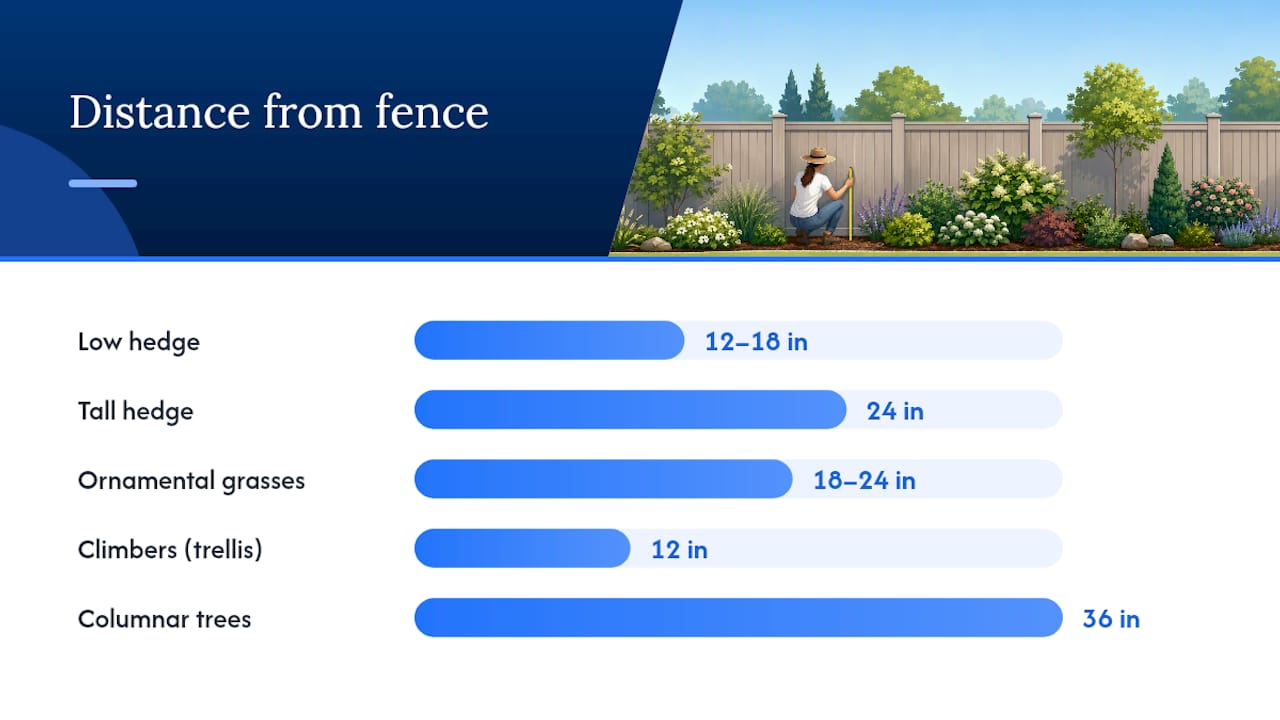
Keep shrubs at least 12–18 inches from the fence itself. Roots need room to spread, and soil piled against fence posts accelerates rot in wood fences and traps moisture against vinyl. Larger trees need a 3–4 foot setback minimum.
For narrow strips under 3 feet wide, skip wide-spreading shrubs entirely. Columnar trees like ‘Sky Pencil’ holly, trellised climbers, or ornamental grasses are your best options. They grow up rather than out, so they fit without crowding the fence or the walkway.
In a staggered double-row layout, offset the back row plants so each back-row plant sits between two front-row plants. This fills gaps faster and creates a denser screen at eye level without requiring tighter individual spacing.
Pro Tip: Place drip emitters at the plant’s dripline (the outer edge of the canopy), not at the trunk. As the plant grows, move emitters outward to follow the expanding root zone. Roots at the trunk base absorb very little water.
How should you water and maintain a fence-line planting?
Microirrigation delivers water slowly and directly to the root zone, improving infiltration and reducing runoff compared to spray sprinklers. For fence-line beds, drip lines or microspray emitters are almost always the right choice because plants are spaced apart rather than covering a continuous turf area.
Hydrozoning is the practice of grouping plants with similar water needs on the same irrigation valve. A drought-tolerant ornamental grass and a moisture-loving hydrangea should never share a valve. Design your bed in zones before you plant, and run separate drip lines for each zone. EPA technical guidance recommends selecting emitter type, flow rate, and spacing based on plant type and site conditions, following ASABE/ICC 802-2014 standards for system design.
Seasonal maintenance schedule
| Month | Task |
|---|---|
| March | Cut back ornamental grasses; inspect emitters; apply pre-emergent if needed |
| April–May | Plant new additions; check mulch depth; begin irrigation |
| June–July | Monitor for pests; adjust run times for heat; check emitter placement |
| August | Deadhead perennials; check for drought stress |
| October | Plant spring bulbs; reduce irrigation run times |
| November | Winterize irrigation; add fresh mulch layer (2–4 in); wrap deer-vulnerable plants |
Mulch depth of 2–4 inches is the standard for most fence-line beds. Less than 2 inches and weeds push through; more than 4 inches and you risk crown rot on shrubs and smothered groundcover. Keep mulch pulled back 2–3 inches from plant stems and fence posts.
Pruning frequency depends on the plant. Ornamental grasses need one hard cut per year in late winter. Climbing roses need light deadheading through the season and a structural prune in late winter. Arborvitae generally needs no pruning unless you are shaping a formal hedge, in which case shear once in late spring after new growth hardens.
Pro Tip: Install a rain sensor or weather-based smart controller on your irrigation system. These devices cost $30–$100 and prevent the system from running during or after rain, which is the single most common source of overwatering in established fence-line plantings.
How do you get a great fence-line look on a limited budget?
Phasing is the most practical approach for homeowners who want a finished look without spending everything at once.
Phase 1 (Year 1): Prepare the bed and plant structure.
- Prep soil, edge the bed, and install irrigation lines before any plants go in
- Buy 3–5 structural evergreens (arborvitae, boxwood, or columnar holly) at nursery size
- These are the plants worth spending money on; they take the longest to establish
Phase 2 (Year 2): Add mid-layer shrubs and climbers.
- Fill gaps with hydrangea, ornamental grasses, or a climbing rose
- Use 1-gallon starts rather than 3-gallon containers to cut costs by 40–60%
- Climbers like clematis establish quickly from small starts and cover fence fast
Phase 3 (Year 3 and beyond): Fill in with perennials and groundcover.
- Divide existing perennials from other parts of your yard rather than buying new
- Seed groundcover in open areas between established shrubs
- Add hardscape accents (river rock edging, salvaged brick borders) to define the bed without plant cost
For chain-link fences, fast-growing annual vines like morning glory or black-eyed Susan vine give you color and coverage in a single season while perennial climbers establish. Containers of ornamental grasses or trailing plants placed at fence posts also create immediate impact at low cost.
DIY vs. hire decision guide:
- DIY: mulching, planting small shrubs and perennials, installing drip tape on existing lines
- Hire a pro: irrigation system design and installation, large tree planting, grading for drainage, any work near fence posts that requires digging
How to plant along your fence in 7 steps
Follow this sequence and you avoid the most common installation mistakes.
- Survey the site and call 811. Mark your planting area with flags. Call 811 at least three business days before digging. Check your municipality’s setback rules for plants near property lines.
- Test and prep the soil. A basic soil test (available through most county extension offices for $15–$25) tells you pH and nutrient levels. Amend with compost at 3–4 inches worked into the top 12 inches of soil.
- Mark spacing. Use stakes and string to mark plant centers before digging any holes. Lay plants out in their pots first to visualize spacing and adjust before committing.
- Plant structural plants first. Install evergreens and large shrubs before smaller plants. Dig holes twice as wide as the root ball and no deeper. Set the crown at or slightly above grade.
- Install irrigation before mulching. Run drip lines along the bed, place emitters at each plant’s dripline, and test the system before covering with mulch. This is the step most homeowners skip and later regret.
- Mulch the entire bed. Apply 2–4 inches of shredded hardwood or bark mulch. Keep it away from stems and fence posts.
- Add climbers and seasonal plants last. Install trellis or wire supports on the fence before planting climbers. Water all new plants deeply at installation, then follow an establishment watering schedule (typically every 2–3 days for the first 4–6 weeks, then tapering to weekly).
Timing matters: spring and fall are the best planting seasons in most U.S. regions. Fall planting gives roots time to establish before summer heat; spring planting works well for warm-season grasses and annuals.
What should you do when fence-line plants go wrong?
Most fence-line failures fall into a short list of fixable problems.
- Deer browsing: Protect arborvitae and young shrubs with wire cages or burlap wraps through winter. For persistent pressure, switch to deer-resistant species: ornamental grasses, boxwood, Russian sage, and most ornamental grasses are rarely browsed.
- Invasive bamboo spreading: If running bamboo has escaped, cut all canes to the ground and apply a systemic herbicide to the cut stems in late summer. Repeat for 2–3 seasons. Replace with clumping Fargesia bamboo and a 24-inch-deep rhizome barrier.
- Poor drainage and soggy soil: Raise the planting bed 4–6 inches above grade with added compost and topsoil. For chronic wet spots, install a French drain before planting. Avoid moisture-sensitive plants like lavender or rosemary in low spots.
- Root competition near fence posts: Avoid planting directly against wooden posts. Roots and soil moisture accelerate post rot. Keep the soil line at or below the original grade at post bases.
- Winter dieback on marginally hardy plants: Mulch heavily in November and wrap tender plants. If a plant dies back to the crown, wait until late April before removing it; many shrubs resprout from the root system.
- Soil or mulch piled against fence boards: This traps moisture and causes rot in wood fences and staining on vinyl. Pull mulch and soil back 2–3 inches from the fence base every spring.
If a plant has failed twice in the same spot, the problem is usually the site, not the plant. Check drainage, sun exposure, and soil pH before replanting with the same species.
The tradeoff most homeowners get wrong
Speed is the enemy of a well-designed fence line. The most common mistake is planting too densely to get privacy fast, then spending years pruning, removing, or replacing plants that have outgrown their space.
The better move is to plant structural evergreens at the correct spacing from day one, accept that the screen will take 2–3 years to close, and fill the gaps temporarily with fast-growing annuals or ornamental grasses. A screen planted at proper spacing will outlast and outperform a crowded one within five years, with far less maintenance.
When privacy is genuinely urgent, ‘Emerald Green’ arborvitae at 3-foot spacing gives you the fastest reasonable screen without creating a disease-prone monoculture. But even then, mix in one or two other species every 15–20 feet. A mixed-species screen is more resilient to pests and disease than a single-species hedge, and it looks more natural.
The other tradeoff worth naming: irrigation. Homeowners who skip drip irrigation to save money upfront spend far more time hand-watering during establishment and lose more plants to drought stress. A basic drip system for a 40-foot fence bed costs $50–$150 in materials and pays for itself in the first dry summer.
Site first. Water second. Species third. That order rarely fails.
Sources
The guidance in this article draws on the following authoritative references. Each one is worth bookmarking if you want to go deeper on a specific topic.
- Spacing of Landscape Plants | Arboriculture & Urban Forestry
- Saving Water With Microirrigation: A Homeowner Guide
- Landscape Watering by the Numbers
- Plants for mixed privacy screens