

A good neighbor fence looks identical from both properties: same finished face, same clean appearance, no exposed rails or post backs facing your neighbor’s yard. Homeowners choose this approach because it removes the “whose ugly side is it?” argument before it starts, satisfies most HOA requirements, and holds up better in any cost-sharing conversation.
Quick check: does your proposed fence qualify?
- Design type is shadowbox, board-on-board, routed-rail, or double-sided picket
- Both faces show finished pickets or panels, not exposed rails or fasteners
- A written notice to your neighbor documents the cost-sharing proposal
- Permit and HOA approval confirmed before breaking ground
- Property line verified by survey or recorded plat
Key Takeaways
A good neighbor fence requires the right design, a written neighbor agreement, and a contractor who can deliver a finished appearance on both sides of the property line.
| Point | Details |
|---|---|
| Both-sided design is the standard | Shadowbox, board-on-board, and routed-rail systems all deliver a finished face on both properties. |
| Survey before you build | Residential boundary surveys run $1,000–$3,200; skipping one risks building on the wrong line. |
| Written notice protects you | A 30-day written notice with cost split, design, and timeline is required under California Civil Code §841 and is good practice in every state. |
| Costs split 50/50 by default | The shared-cost presumption is equal responsibility; upgrade costs above “reasonable” standard fall to the requesting party. |
| Advantagefencenj handles the full project | Design, permitting, installation, and warranty in one contract — site visits available across New Jersey. |
Table of Contents
- Why the “good side / bad side” problem exists
- Design options that give you a finished look on both sides
- How a good neighbor fence is actually built
- Permits, costs, and who pays for a shared fence
- What a good neighbor fence actually costs
- Keeping both sides looking good over time
- Questions to ask before hiring a fence contractor
- A contractor’s honest take on what homeowners get wrong
- Advantagefencenj builds fences that look right from both yards
- Sources
Why the “good side / bad side” problem exists
Standard single-sided privacy fences attach pickets to horizontal rails on one face only. The homeowner who pays gets the smooth side; the neighbor gets the structural skeleton. That asymmetry is the source of most fence disputes, and it is entirely a construction choice, not an engineering requirement.
HOAs amplify the problem fast. Many associations require a finished appearance facing the street or neighboring properties, and a single-sided build fails that standard on day one. Some municipalities have adopted similar rules. The result: a fence that passes your own eye test can still trigger a violation notice within weeks of installation.
Single-sided vs. both-sided: a quick comparison
- Single-sided privacy fence: lower material cost upfront, faster to build, but one neighbor gets an unfinished view and HOA compliance is often at risk
- Both-sided finished fence: slightly higher material cost, takes more planning, but satisfies HOA rules, supports cost-sharing conversations, and avoids the resentment that builds when one yard looks better than the other
- Maintenance: both-sided designs distribute weathering more evenly; single-sided fences tend to warp or cup toward the exposed rail side over time
The practical impact on neighbor relations is real. A fence that looks finished from one yard and industrial from the other is a standing grievance. Both-sided designs eliminate that friction at the source.
Design options that give you a finished look on both sides
Four construction approaches reliably achieve a neighbor-friendly finish. Each has a different cost profile and maintenance demand.
Shadowbox (alternating pickets)
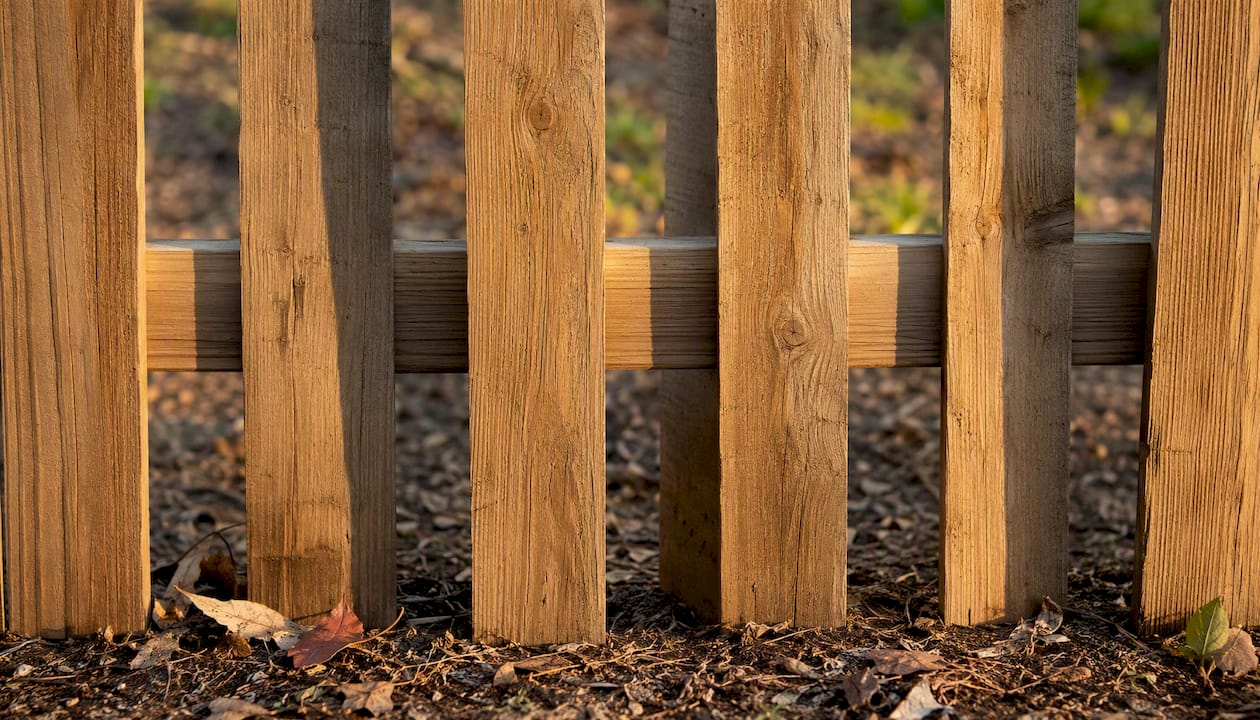
Shadowbox fences alternate pickets on opposite sides of a center rail, so each face shows a picket-gap-picket pattern. Neither side is “wrong.” The gaps also allow airflow, which reduces wind load and warping. This is the most common good neighbor fence approach for wood and composite builds because it uses roughly the same material as a single-sided fence while finishing both faces.
Board-on-board (double picket)
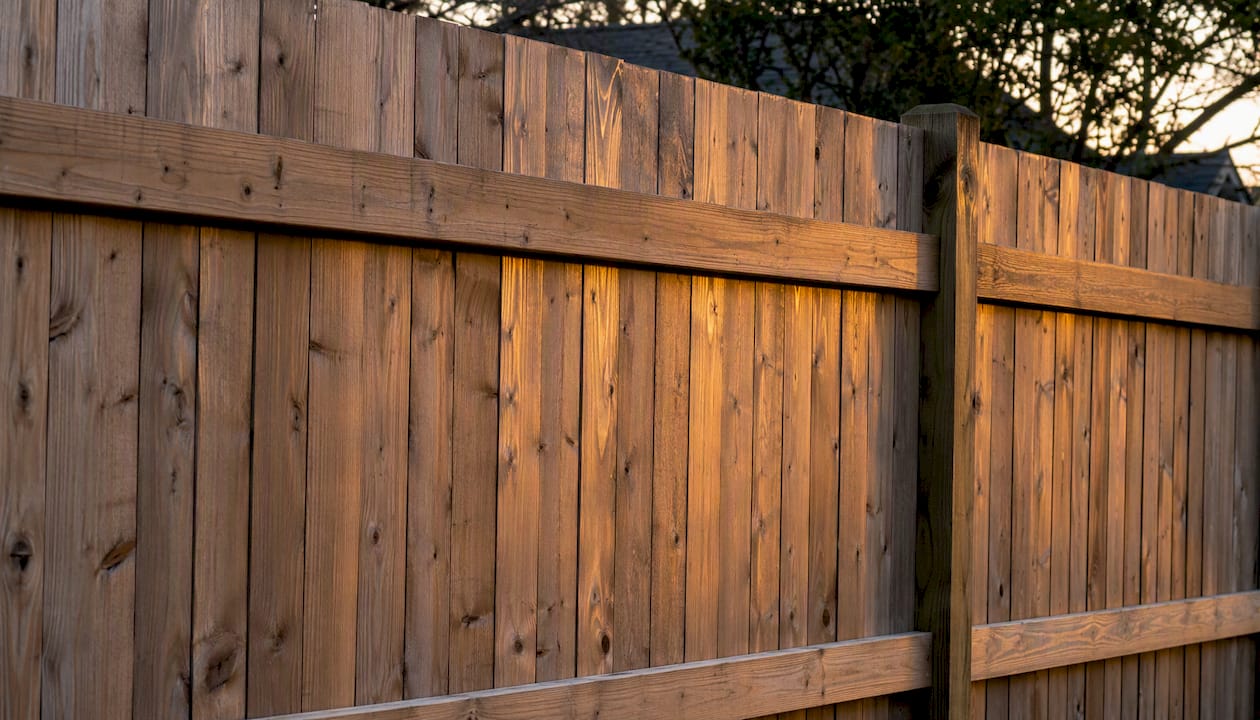
Board-on-board overlaps pickets on the same rail so each face sees a solid wall of wood. It delivers more privacy than shadowbox but uses significantly more material. As FenceTrac notes, doubling pickets on the same rail is expensive and less effective than a true shadowbox when the goal is a finished appearance on both sides. Board-on-board makes sense when maximum privacy matters more than cost efficiency.
Routed-rail and U-channel/frame systems
These systems route the rail into a channel or frame so fasteners and structural members are hidden inside the panel. Both faces show only the picket surface. Vinyl and aluminum fences often use this method, which is why they tend to satisfy HOA finished-appearance rules without any additional detailing. Maintenance is lower because there are no exposed fasteners to rust or loosen, though warranty terms vary by manufacturer.
Double-sided picket panels
Pre-built panels with pickets on both faces are available in vinyl and some composite lines. Installation is faster, but panel replacement after damage costs more than replacing individual pickets. These work well for homeowners who want a clean install with minimal on-site labor.
Design comparison
Material notes:
- Cedar: weathers attractively, needs sealing every 2–3 years, shows well on both sides
- Pressure-treated pine: lower cost, holds up against rot, less visually refined
- Composite: low maintenance, consistent color, heavier than wood
- Vinyl: no painting, no rot, suits U-channel systems well; see vinyl fencing options for specifics
- Aluminum: durable, rust-resistant, works with frame systems; aluminum fencing handles both-sided finishes cleanly
How a good neighbor fence is actually built
Understanding the construction sequence helps you review a contractor’s bid intelligently and catch problems before they become arguments.
- Locate and mark the property line. Use a recorded plat or a licensed surveyor’s stakes. Never assume the existing fence or a neighbor’s assumption is accurate.
- Lay out post locations. Standard spacing is 6–8 feet on center. Mark each post location with a stake before digging.
- Dig post holes. Depth should be roughly one-third of the total post length, with a minimum of 24 inches in most climates. Frost depth in your region may require deeper holes.
- Set posts in concrete. Crown the concrete slightly above grade and slope it away from the post to shed water. Let concrete cure at least 24–48 hours before attaching rails.
- Attach rails. For shadowbox, a center rail at mid-height carries the alternating pickets. For routed-rail systems, rails slide into pre-cut channels in the posts.
- Install pickets. For shadowbox, alternate pickets on opposite faces of the center rail, maintaining consistent spacing with a spacer block. For board-on-board, overlap each picket by 1–1.5 inches on the same rail face, then repeat on the opposite face.
- Cap posts. Post caps shed water and extend post life significantly. Flat caps work; pyramid or ball caps add a finished look from both sides.
- Check grade and drainage. Picket bottoms should clear the ground by at least 2 inches to prevent rot. On sloped lots, step the panels rather than raking them to maintain a consistent picket height on both faces.
Homeowner inspection checklist during installation:
- Post spacing consistent and posts plumb (use a level, not your eye)
- Concrete crowned and sloped away from each post
- Pickets alternating correctly on both faces (shadowbox) or overlapping evenly (board-on-board)
- Post caps installed on every post
- Picket bottoms clearing grade by at least 2 inches
- No exposed fastener heads on the neighbor-facing side
Pro Tip: Ask your contractor to use stainless steel or hot-dipped galvanized screws rather than standard zinc-plated ones. Standard screws rust through in 3–5 years in wet climates, leaving rust streaks on both faces of the fence. The cost difference per project is small; the appearance difference over a decade is significant.
Permits, costs, and who pays for a shared fence
Permit and HOA checklist
Before any post goes in the ground, confirm these with your local building department and HOA:
- Maximum fence height for your zone (commonly 4 feet in front yards, 6 feet in rear yards, but this varies by municipality)
- Approved materials list (some historic districts restrict vinyl or metal)
- Setback requirements from the property line
- HOA design standards (finished-face requirement, color, cap style)
- Whether a permit is required and what drawings must be submitted
FindLaw’s property line and fence guide confirms that local codes and HOA rules layer on top of state statutes, so checking both is not optional.
Boundary verification
A property survey before installation is the single best way to prevent a fence dispute from becoming a legal one. Residential boundary surveys typically cost a few thousand dollars depending on lot size and complexity, with larger or irregular lots costing more. That cost is modest compared to the expense of moving a fence that was built on the wrong line. Advantagefencenj’s guide on survey for fence walks through what to expect from a surveyor and when it is worth the investment.
Who pays: the shared-cost presumption
California Civil Code §841 is the most cited statutory model in the US for shared fence costs. It presumes that adjoining landowners share equal responsibility for the reasonable costs of constructing, maintaining, or replacing a boundary fence. The law requires a 30-day written notice before construction that includes:
The specific problem with the existing fence (or why a new one is needed), the proposed solution, estimated costs, the proposed cost split, and the planned construction timeline. Omitting any of these elements can give a neighbor a procedural defense if the matter goes to court.
This 50/50 presumption is the starting point, not a guarantee. LegalClarity’s summary of Civil Code 841 notes that courts may reduce or deny a neighbor’s contribution when the fence provides disproportionate benefit to one party, when costs are excessive, or when one owner faces undue hardship. If you want premium cedar over standard pressure-treated pine, Schorr Law’s overview confirms that courts typically hold the requesting party responsible for the upgrade cost above the “reasonable” standard.
Note for New Jersey homeowners: New Jersey does not have a single statewide good neighbor fence statute equivalent to California’s Civil Code §841. Neighbor fence law in New Jersey is governed primarily by local ordinances and common law principles, so your municipality’s building department is the first stop, not a state code section.
Written notice template (adapt for your state)
- Date and your name and address
- Neighbor’s name and address
- Description of the existing fence condition or reason for new construction
- Proposed design, materials, and dimensions
- Estimated total cost and proposed split (e.g., 50/50)
- Proposed start date and completion timeline
- Your contact information and a request for written acknowledgment
Deliver by certified mail or hand-delivery with a signed receipt. Keep a copy.
When a neighbor resists
Document every conversation in writing. Offer two or three design options at different price points. If the dispute stalls, community mediation services are available in most counties and cost far less than small-claims court. Collect photos of the existing fence condition, any written estimates, and your survey stakes as evidence.
What a good neighbor fence actually costs
Cost ranges vary by material, region, and design complexity. These are general benchmarks, not quotes.
- Pressure-treated pine shadowbox: lower end of the wood range; lifespan roughly 15–20 years with maintenance
- Cedar shadowbox or board-on-board: mid-range; lifespan 20–30 years with regular sealing
- Composite: higher upfront cost; lifespan 25–30 years with minimal maintenance
- Vinyl: comparable to composite upfront; lifespan 20–30 years; no painting required
- Aluminum: higher cost per linear foot; lifespan 30+ years; suits frame/U-channel systems
Boundary surveys typically cost a few thousand dollars for a standard residential lot, as noted above. Budget for this separately from fence installation.
Two cost-split scenarios:
Scenario A (standard 50/50): A 100-linear-foot cedar shadowbox fence is agreed upon by both neighbors. Total cost is split equally. Both neighbors sign the written notice and contribute before installation begins.
Scenario B (upgrade paid by requesting party): One neighbor wants composite instead of cedar. The neighbor requesting the upgrade pays the difference between composite and cedar pricing. The other neighbor contributes only the cedar-equivalent share.
Courts and mediators assess “reasonable” costs based on standard materials and labor for the region. Luxury finishes, custom caps, or decorative inserts above that standard are generally the requesting party’s expense.
Keeping both sides looking good over time
A both-sided fence only stays a good neighbor fence if both sides are maintained. Here is a practical annual schedule:
- Spring inspection: Walk both sides of the fence. Check for loose pickets, heaving posts (frost damage), rust on fasteners, and rot at the base of wood posts.
- Clean the fence: Pressure-wash wood and vinyl fences to remove mold, mildew, and dirt. Use a brush and mild detergent on aluminum.
- Seal or stain wood fences: Cedar and pressure-treated pine need a penetrating sealant or stain every 2–3 years. Skipping this step is the fastest way to shorten a wood fence’s life.
- Check fasteners: Tighten any loose screws. Replace any that show rust bleed.
- Trim vegetation: Cut back any vines, shrubs, or grass growing against the fence base. Trapped moisture accelerates rot and corrosion on both sides.
- Fall check: Look for any damage from summer storms. Replace cracked or split pickets before winter moisture gets into the wood grain.
Material-specific notes:
- Cedar and pine: most maintenance-intensive; seal every 2–3 years
- Vinyl: wipe down annually; no sealing needed; check panel locks and post caps
- Composite: occasional cleaning; inspect for fading or surface cracking
- Aluminum: inspect welds and powder coat; touch up chips to prevent corrosion
Pro Tip: On a shared fence, agree in writing with your neighbor on a maintenance schedule before installation. A simple one-page document stating who handles annual cleaning and who splits repair costs avoids the most common post-installation argument.
Questions to ask before hiring a fence contractor
A contractor who has built both-sided fences before will answer these questions without hesitation. One who stumbles is a signal.
Must-ask questions:
- Are you licensed and insured in this state? Can you provide proof of both?
- Do you pull permits, or is that the homeowner’s responsibility?
- Can you show me photos of completed shadowbox or board-on-board fences from both sides?
- What warranty do you offer on materials and labor?
- Who are two or three recent references I can call?
- How do you handle post-installation issues like a leaning post or a split picket?
What a complete bid should include:
- Linear footage, post spacing, and post depth
- Specific material species or product name (not just “wood” or “vinyl”)
- Panel design (shadowbox, board-on-board, routed-rail) stated explicitly
- Whether permit fees are included or billed separately
- Start date and estimated completion
- Payment schedule tied to milestones, not just a deposit plus final payment
Red flags:
- Bid asks for more than 30–40% upfront
- No written contract, only a verbal agreement
- Contractor cannot name the specific wood species or vinyl product line
- No mention of permit requirements in a jurisdiction that requires them
- Pressure to sign before you have compared at least two bids
When comparing bids, ask each contractor to specify the finished-face method. “Privacy fence” in a bid does not guarantee a both-sided finish. Get that language in writing.
A contractor’s honest take on what homeowners get wrong
Most fence projects that go sideways do so in the first two weeks, before a single post is set. The most common mistake: starting the neighbor conversation after the permit is pulled, not before. By then, the design is locked, the timeline is set, and the neighbor feels ambushed rather than consulted.
A typical project runs like this: site visit and measurement, then design confirmation, then permit application (which can take 2–6 weeks depending on the municipality), then material order, then installation. The install itself on a standard residential fence usually takes 1–3 days. The follow-up inspection, if required, adds another week.
The missteps that add time and cost:
- Skipping the survey and discovering mid-install that the proposed line is wrong
- Choosing a material without checking HOA approval first
- Not confirming permit requirements and having to stop work mid-project
- Failing to document the neighbor agreement in writing before starting
Homeowners should expect a written warranty covering both materials and workmanship. A one-year labor warranty is a minimum; reputable installers often extend that to two or three years. Ask what the follow-up process looks like if a post shifts or a picket splits in the first season.
Advantagefencenj builds fences that look right from both yards
Hiring a contractor who has never built a true both-sided fence is the fastest way to end up with a good neighbor fence that only looks good from your side. Advantagefencenj designs and installs fences built to finish cleanly on both properties, from shadowbox cedar to vinyl and aluminum panel systems, with permitting assistance included.

The full services overview covers residential, commercial, and recreational installations across New Jersey, including boundary survey coordination, HOA submission support, and written warranties on materials and labor. Getting a quote starts with a site visit: Advantagefencenj measures the line, confirms the design with you, and handles the permit paperwork so you are not chasing the building department yourself. Contact Advantagefencenj to schedule your site visit and get a written estimate.
Sources
- Leginfo
- California Civil Code 841: The Good Neighbor Fence Law – LegalClarity
- Property Line & Fence Rules in California (FindLaw)
- California Good Neighbor Fence Law – Who Pays, Rules & Disputes (Schorr Law)