

For most sloped driveways, a raked (racked) swing gate is your safest bet unless you have wide side clearance and can afford the run-back space a sliding gate demands. Before you commit to either, measure the slope angle, plan where water will drain, and budget for a radial damper or mechanical brake so the gate can’t roll backward downhill. Whatever motor you’re considering, size it up for the “slope penalty,” not the flat-ground spec sheet.
Your top three options, in order of how often they solve the problem:
- Raked swing gate — the panel’s bottom edge is cut at an angle to match the grade, works on most residential slopes.
- Sliding gate with adequate run-back — viable if you have 4 to 5 times the gate’s width in clear side space.
- Stepped or terraced panel gate — good for steeper, uneven, or rocky slopes where a straight rake won’t track the ground.
Key Takeaways
The safest, most durable gate on a slope combines the right structural type for your grade with a properly sized motor, a radial damper, and drainage planned before the first post goes in.
| Point | Details |
|---|---|
| Match gate type to slope | Use a racked swing for mild grades, sliding only with 4 to 5 times the width in run-back space. |
| Size the motor for incline duty | Flat-ground motors lose significant pulling capacity on a slope, so specify an incline-rated unit. |
| Make dampers non-negotiable | A radial damper or mechanical brake prevents rollback if power fails on a sloped sliding gate. |
| Plan drainage before installation | Grade away from motor pads and posts, and pour the motor pad level and elevated even when the track follows the grade. |
| Get a professional survey | Advantage Fence handles site surveys, custom rake fabrication, motor sizing, and drainage work for sloped gate projects. |
Table of Contents
- Practical Options for a Sloped Driveway Gate
- How Do You Choose the Right Gate for Your Slope?
- Installing a Racked Swing Gate on a Slope: Step by Step
- Can You Install a Sliding Gate on a Slope?
- Hardware and Materials That Hold Up on an Incline
- Why Drainage Planning Matters as Much as the Gate Itself
- Maintenance and Troubleshooting for Sloped Gates
- What to Expect for Timeline and Cost
- What Installers Actually See on Sloped Sites
- How Advantage Fence Handles Gates on Sloped Property
- Sources
Practical Options for a Sloped Driveway Gate
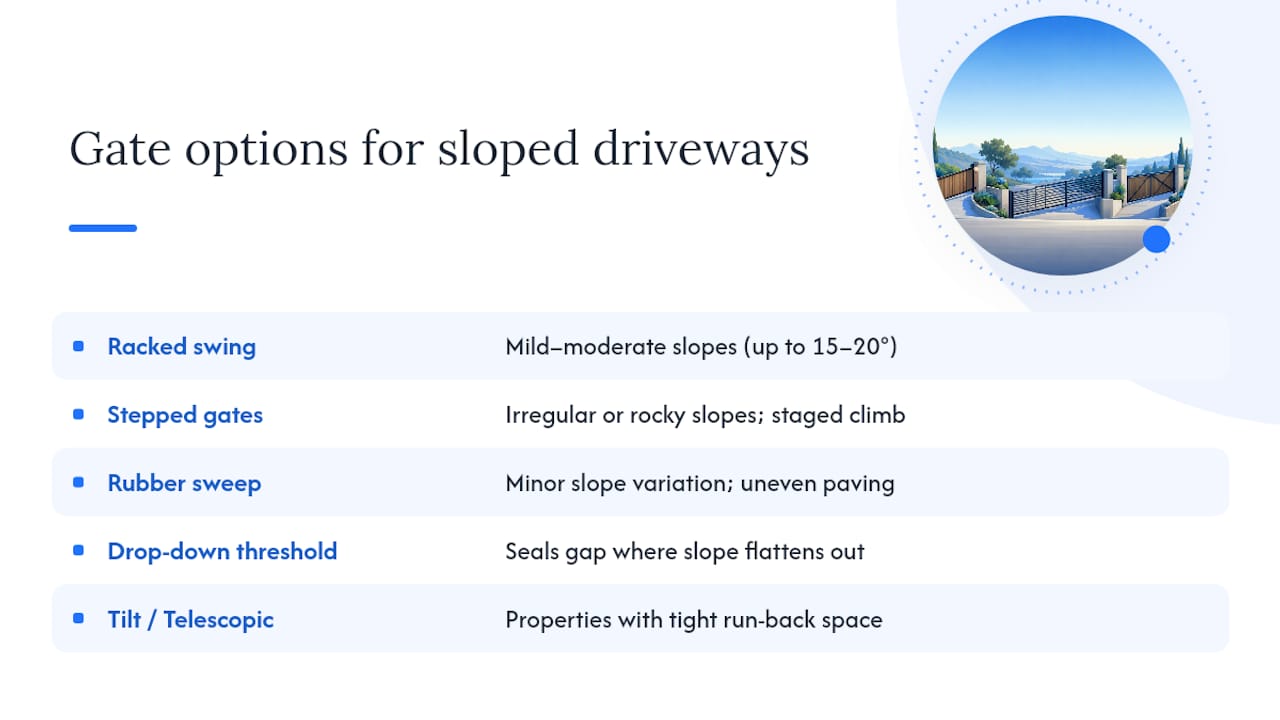
A racked (or raked) swing gate has its bottom rail cut on an angle so it follows the driveway’s pitch instead of hovering over one end and dragging the other. It handles mild to moderate slopes, roughly up to 15 to 20 degrees, without much fuss.
Stepped or terraced gates use two or more flat panels set at different heights, hinged so they climb the grade in stages. They cost more to fabricate but hold up better on irregular or rocky slopes where a single rake angle can’t track the ground.
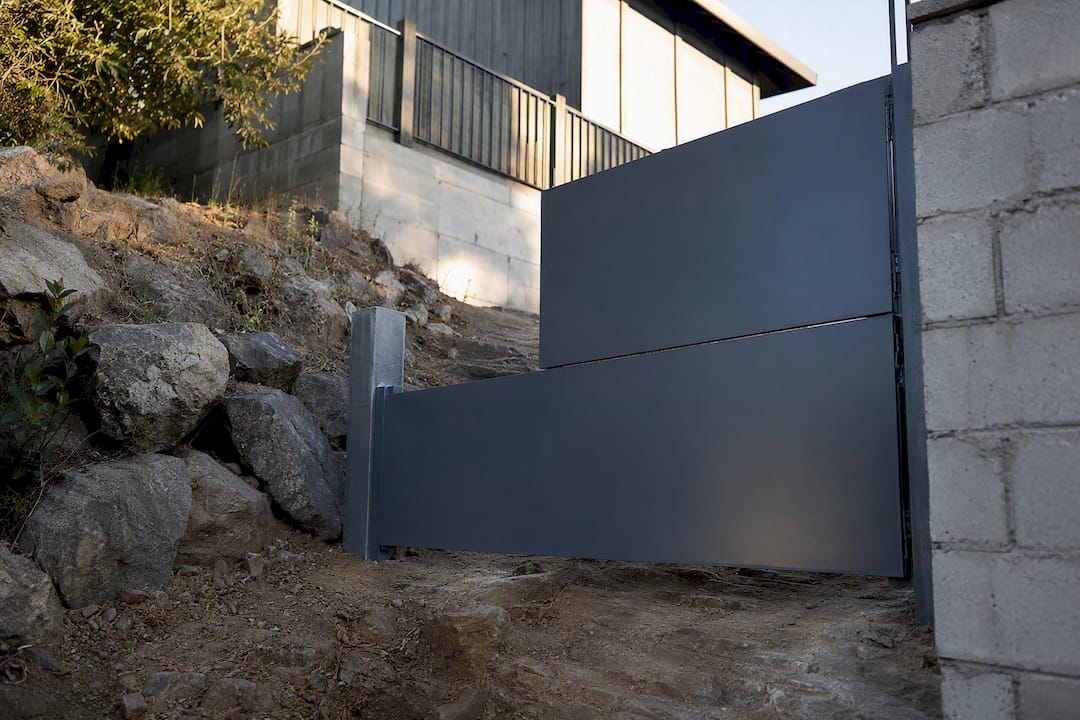
A rubber sweep or bottom seal handles minor slope variation or uneven paving without a full custom rake. It’s cheap insurance against rattling and water splash-back.
Drop-down threshold panels drop into a channel when the gate closes, sealing the gap on a slope that flattens out at the bottom. Tilt gates and telescopic sliders serve properties where run-back space is tight. Ask your installer for a diagram of each option against your actual grade before you decide. Seeing the rake angle drawn against your driveway profile prevents a lot of costly guesswork.
How Do You Choose the Right Gate for Your Slope?
Start with the math — and consider expert fencing services from Trew Landscape for professional installation and site prep on challenging slopes. Measure the rise (vertical change) and the run (horizontal distance) across the gate opening, then divide rise by run to get your slope ratio.
Before you pick a gate type, record these site details:
- Side clearance available for a sliding track or stacked panels.
- Whether traffic enters uphill or downhill, since that changes hinge stress and damper needs.
- The vehicle’s swing path and turning radius at the gate.
- Pedestrian access, especially if the property needs a separate walk gate.
- Any local permit, setback, or easement rules that affect post placement.
From there, the decision flow is fairly simple:
- Mild, consistent slope with generous width but no side space: racked swing gate.
- Flat or gently sloped run with 4 to 5 times the gate width open on one side: sliding gate.
- Steep or uneven grade with tight side clearance: telescopic or stacked sliding design.
- Anything involving retaining walls, drainage rerouting, or a slope over 20%: bring in a professional for a proper site survey before ordering hardware.
Installing a Racked Swing Gate on a Slope: Step by Step
Racked swing gates are the most common fix for a gate on a slope, and they’re forgiving enough for a careful DIY homeowner or a general contractor to handle, provided you follow the sequence in order.
- Survey and mark. Confirm the slope ratio, mark post locations, and check that the swing path clears the ground at every point of the arc.
- Prep the site. Grade the area so water sheds away from where the posts will sit, not toward them.
- Set the posts. Both posts go in plumb, vertical, even though the ground between them isn’t level. Depth and concrete footing should match the gate’s weight and height.
- Hang the gate. Use a level reference line to establish bottom clearance, typically 2 to 4 inches, and add extra clearance on sloped or snow-prone driveways so the rail doesn’t drag or plow.
- Adjust for the rake. Fine-tune hinge offsets or adjustable hinges until the bottom edge parallels the grade across the full swing.
- Set the latch and drop bolt. Align these last, once the gate’s resting position is confirmed under real-world settling.
- Test everything. Swing the gate through its full arc, check for binding at the high and low points, confirm the manual release works, and if the slope exceeds a small threshold, install a radial damper before calling the job done. Test the release under a simulated power failure if the gate is motorized.
Pro Tip: Walk the gate through a full open-close cycle by hand before you ever power it on. Binding you can feel with your hand becomes a stripped motor gear within a few weeks of automated cycling.
Can You Install a Sliding Gate on a Slope?
Yes, but only under specific conditions. Sliding gates need somewhere for the panel to slide into, and on a slope that run-back requirement grows fast. Sliding gates on sloped sites often need 4 to 5 times the opening width in clear run-back space, compared to a level installation, because the track has to accommodate the grade change without binding.
A few things to check before you commit to a slider:
- Confirm you actually have that side clearance, measured, not eyeballed.
- Size the motor for the slope penalty; a unit rated for flat ground can lose a large share of its effective pulling capacity on an incline.
- Add a radial damper or mechanical brake so the panel can’t run away downhill if power drops.
Pro Tip: If run-back space is tight, ask about a telescopic or stacker gate. It cuts the footprint roughly in half by nesting two panels, but that convenience comes with a heavier motor load, so don’t undersize the drive unit to compensate.
Hardware and Materials That Hold Up on an Incline
The hardware you choose determines whether a sloped gate lasts ten years or needs adjustment every spring.
- Adjustable, high-capacity hinges let you fine-tune the rake angle after installation, which matters once posts settle or soil shifts.
- Drop pins or drop bolts anchor the gate in the open or closed position, especially useful on windy or exposed sites.
- Rubber bottom sweeps close small gaps left by minor grade variation and keep water and debris from working under the panel.
- Motors rated for incline duty, not standard flat-ground units, since slope creates a real capacity cliff that undersized motors can’t overcome.
- A level, elevated motor mounting pad, even though the track or gate itself follows the grade. Pouring the motor pad level and slightly raised keeps water out of the housing, one of the more overlooked details in slope installations.
Why Drainage Planning Matters as Much as the Gate Itself
A gate on a slope inevitably interacts with water. Panels, tracks, and posts can redirect runoff in ways that erode footings or flood a motor housing within a season or two, especially on a driveway that already channels rain toward the low end.
The fix is straightforward if you plan for it early:
- Grade the entire installation area so water flows away from the motor pad, never toward it.
- Install French drains or gravel pockets around post footings on the downhill side.
- Keep sliding tracks elevated or protected so water doesn’t pool and freeze inside the channel.
Proper yard grading directs water away from posts and mechanical hardware, and skipping that step is one of the most common reasons a sloped gate fails early.
Pro Tip: Don’t pour the track footing level on a sloped driveway. The track needs to follow the incline, but the motor pad still has to be poured level and raised to keep water out of the housing.
Maintenance and Troubleshooting for Sloped Gates
Sloped gates put uneven stress on hinges, tracks, and motors, so they need a slightly closer eye than a flat-ground installation.
Check these on a regular schedule:
- Hinge wear and play, especially on the downhill side, which carries more load.
- Bottom clearance, since posts and soil can shift over a season and close the gap.
- Track alignment and debris buildup, particularly after heavy rain or leaf fall.
- Motor temperature and sound during operation.
Quick fixes for common issues:
- Binding at one point in the swing: adjust hinge offset rather than forcing the gate.
- Gravel or debris in a slide track: clear it before it jams the motor.
- Persistent sag: re-tension or re-seat the rack rather than compensating with the latch.
Call a professional if you see post movement, sag that returns after adjustment, or a motor that runs hot under normal use.
What to Expect for Timeline and Cost
A straightforward racked swing gate typically moves through site survey, permitting (if your municipality requires it), post installation and concrete curing, then gate hanging and final commissioning, often spread across one to two weeks once materials arrive.
Cost climbs with:
- Custom rake fabrication instead of an off-the-shelf panel.
- A motor class built for incline duty rather than a standard flat-ground unit.
- Any drainage or retaining wall work needed around posts.
- Telescopic or cantilever hardware, which costs more upfront but solves tight run-back problems.
When you request quotes, ask each bidder to itemize drainage and safety hardware, like the radial damper, separately. A quote that skips those line items usually means they’re being handled as an afterthought, not planned from day one.
What Installers Actually See on Sloped Sites
Drainage gets overlooked far more often than gate mechanics. Homeowners plan for the rake angle and the motor, then discover after the first hard rain that water is pooling against a post footing nobody graded for. Run-back space is the other surprise. It always looks like enough room until the tape measure comes out.
Two habits prevent most callbacks: measure the actual slope before ordering hardware, and never skip the radial damper on an incline. Keep the motor pad dry and level, and the rest of the installation tends to take care of itself.
How Advantage Fence Handles Gates on Sloped Property
Getting a gate on a slope right takes more than a tape measure and a level. It takes someone who’s poured motor pads on a grade before and knows exactly where water wants to go once your driveway is in the way. Advantage Fence runs a proper site survey before recommending racked, stepped, or sliding designs, then handles custom fabrication, motor sizing for incline duty, and the drainage or grading work that keeps posts and mechanical hardware protected for years.

That includes permit coordination where your municipality requires it, and installation backed by a warranty, so you’re not the one troubleshooting a sagging rack or an overheating motor eighteen months from now. If your driveway pitches, dips, or drops off unevenly, request a site estimate and get a design built around your actual grade instead of a catalog panel that was never meant for it.
Sources
For readers who want more technical depth, these sources back the specific claims made throughout this guide.